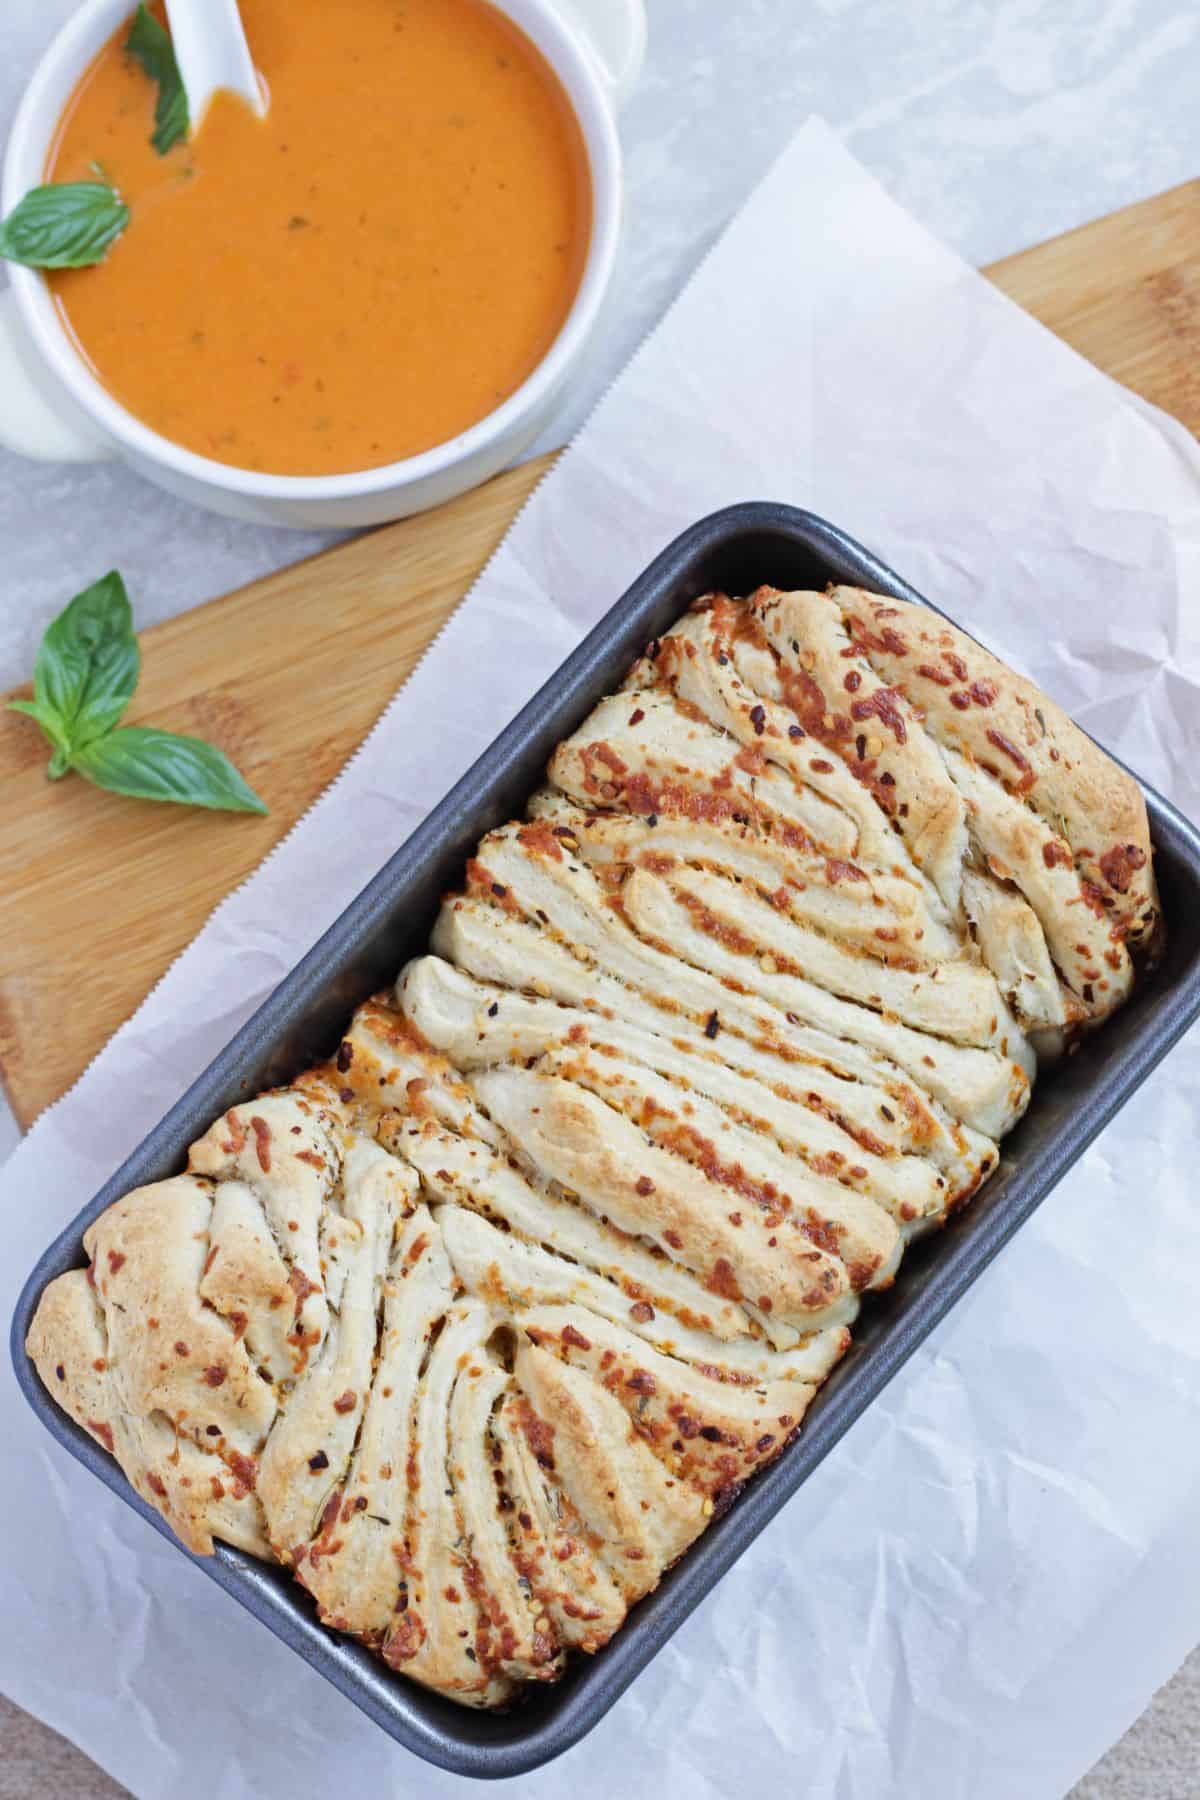
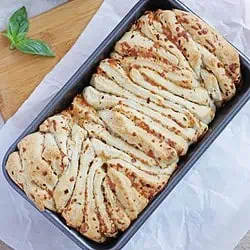
Herb and Cheese Pull Apart Bread

This classic Italian Garlic Herb and Cheese Pull Apart Bread is sure to be everyone's favorite at any holiday party. This Pull Apart Bread is so simple to make and perfect for entertaining.
When it comes to making bread, my first choice is Pull Apart Bread. I just love how simple it is to put together and bake Pull apart breads.
I have been baking pull-apart breads with several flavor combinations and this Garlic Herb and Cheese Bread happens to be my first favorite. Anything with garlic is a winner in our house. But this bread just does not have the goodness of the garlic but also the flavor from the Italian herbs and the deliciousness of the cheese.
Why Bake this Italian Herb and Cheese Pull Apart Bread?
- I have to say first and foremost, it is absolutely delicious.
- It is very convenient to bake for a crowd.
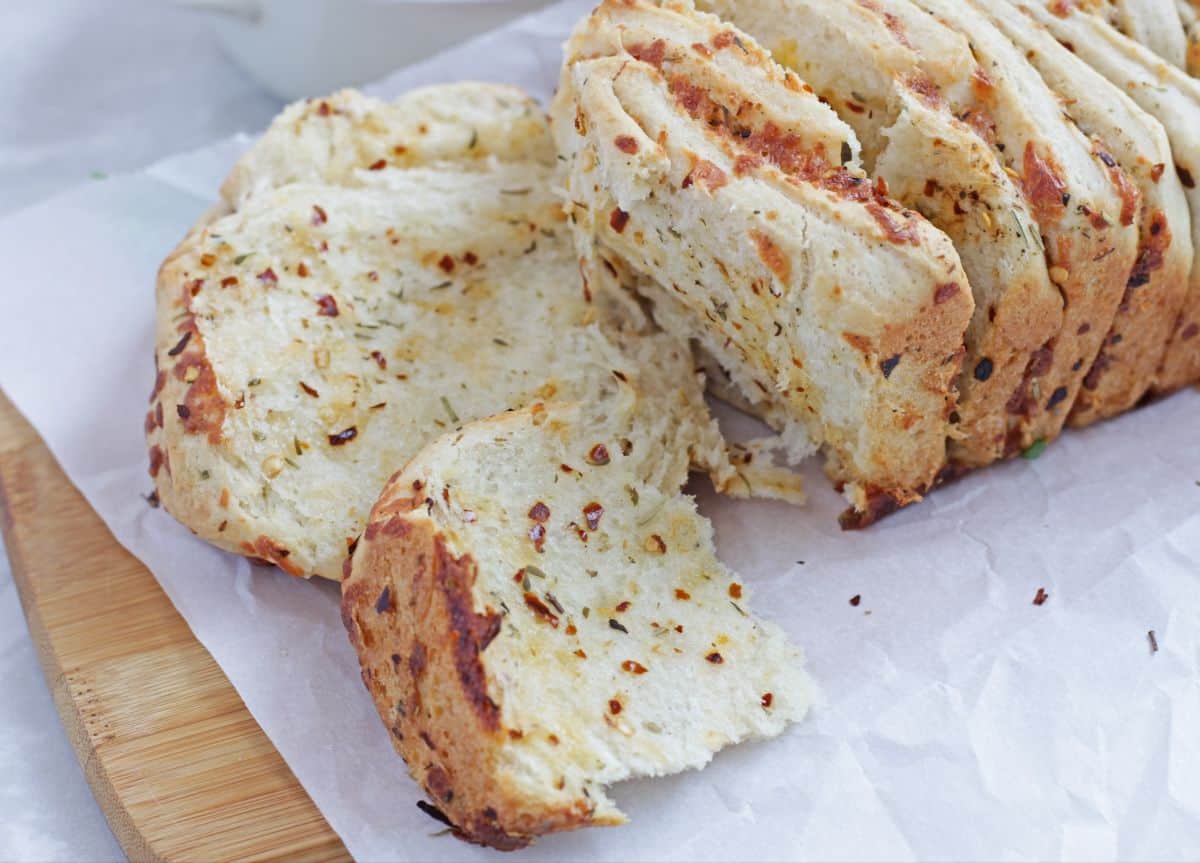
- Easy to serve, as it is a pull apart and people can pull out their own piece.
- The flavors and fillings can be adjusted based on personal preference.
- Kid-approved recipe.
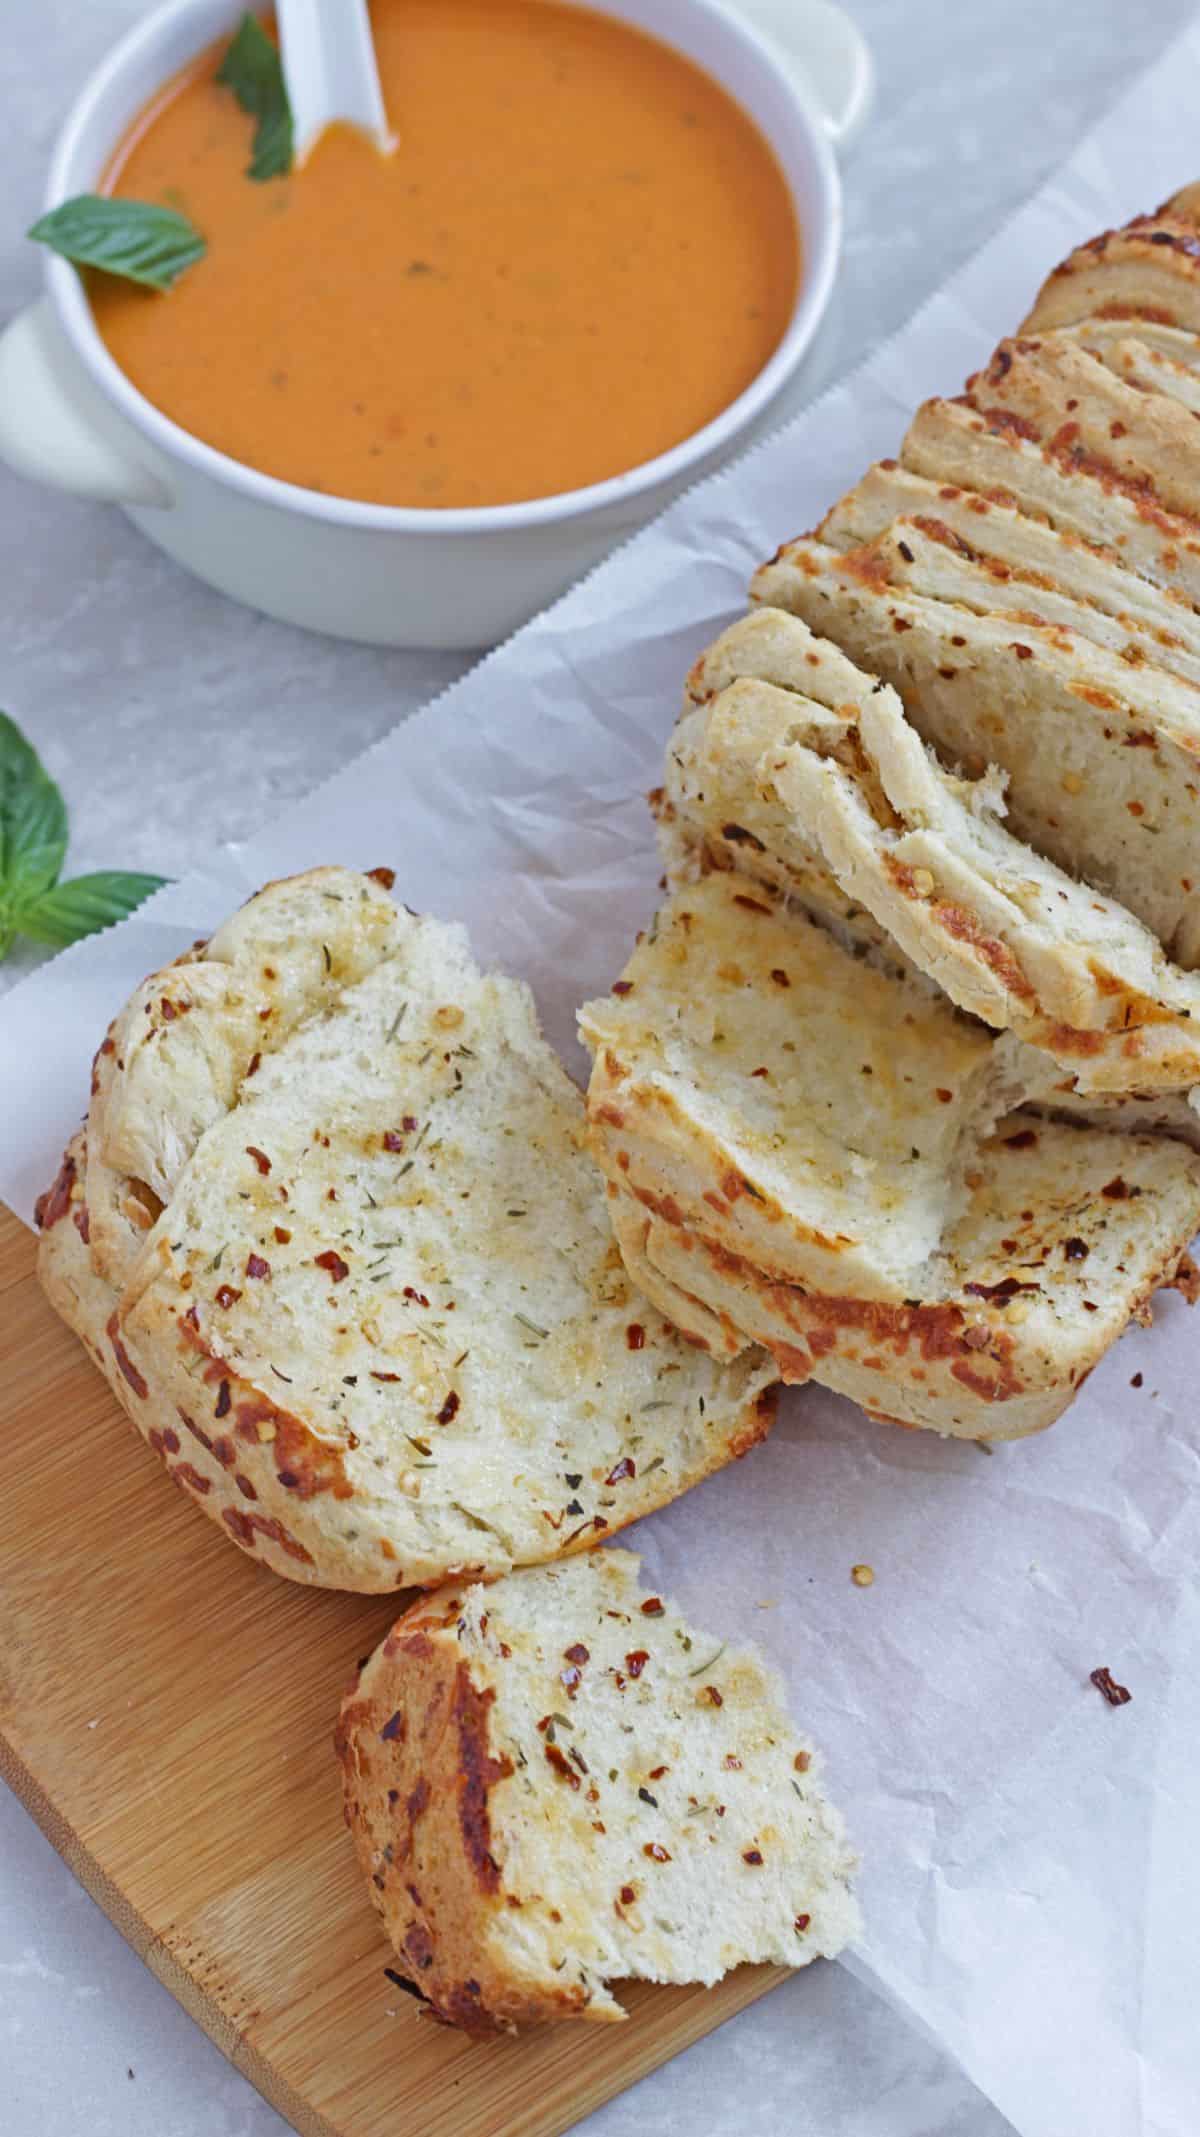
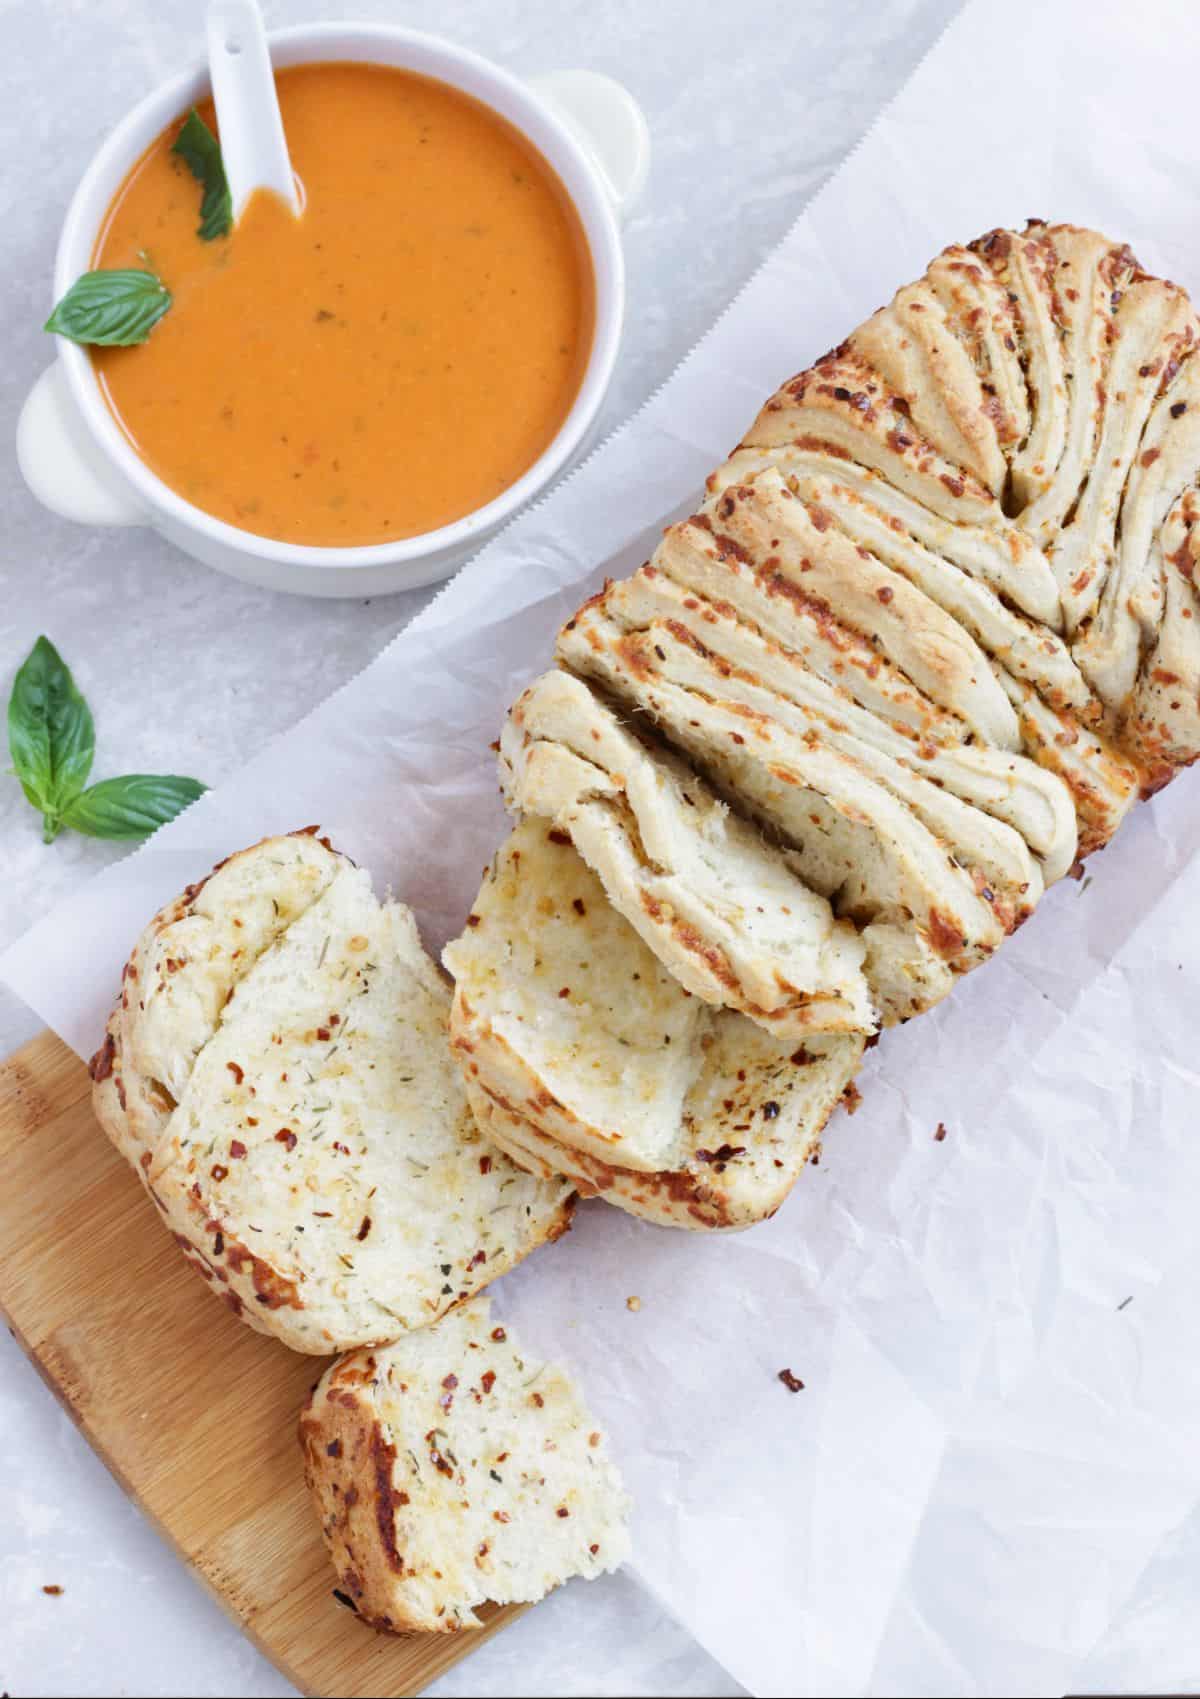
- A great pair for the fall weather soups to dip and enjoy.
What kind of fillings can be used?
- I have used garlic in the dough and herbs and cheese in the layer. We can skip the garlic in the dough if preferred.
- I have used Italian mixed herbs, but we can use any kind of herb that we prefer.
- We can make it as a sweet bread using cinnamon and sugar. The perfect example would be something similar to this Monkey Bread.
- I have used the Mexican blend cheese in the recipe, but have used Gruyere in the past. So, play around with any cheese and flavor.
- Herb oil would be a great alternative to layer inside the bread. In that case, skip spreading the butter and use the herbed oil.
Instant Pot for Proofing the Dough
I am a big fan of my Instant Pot but one of the things that I did not use it for is to proof the dough. And that I did for the first time now to make the dough for Garlic herb and cheese pull-apart bread and cannot be more happy.
Instant Pot absolutely cut down the proofing time by half and that makes it easy for me to bake bread even more often now.
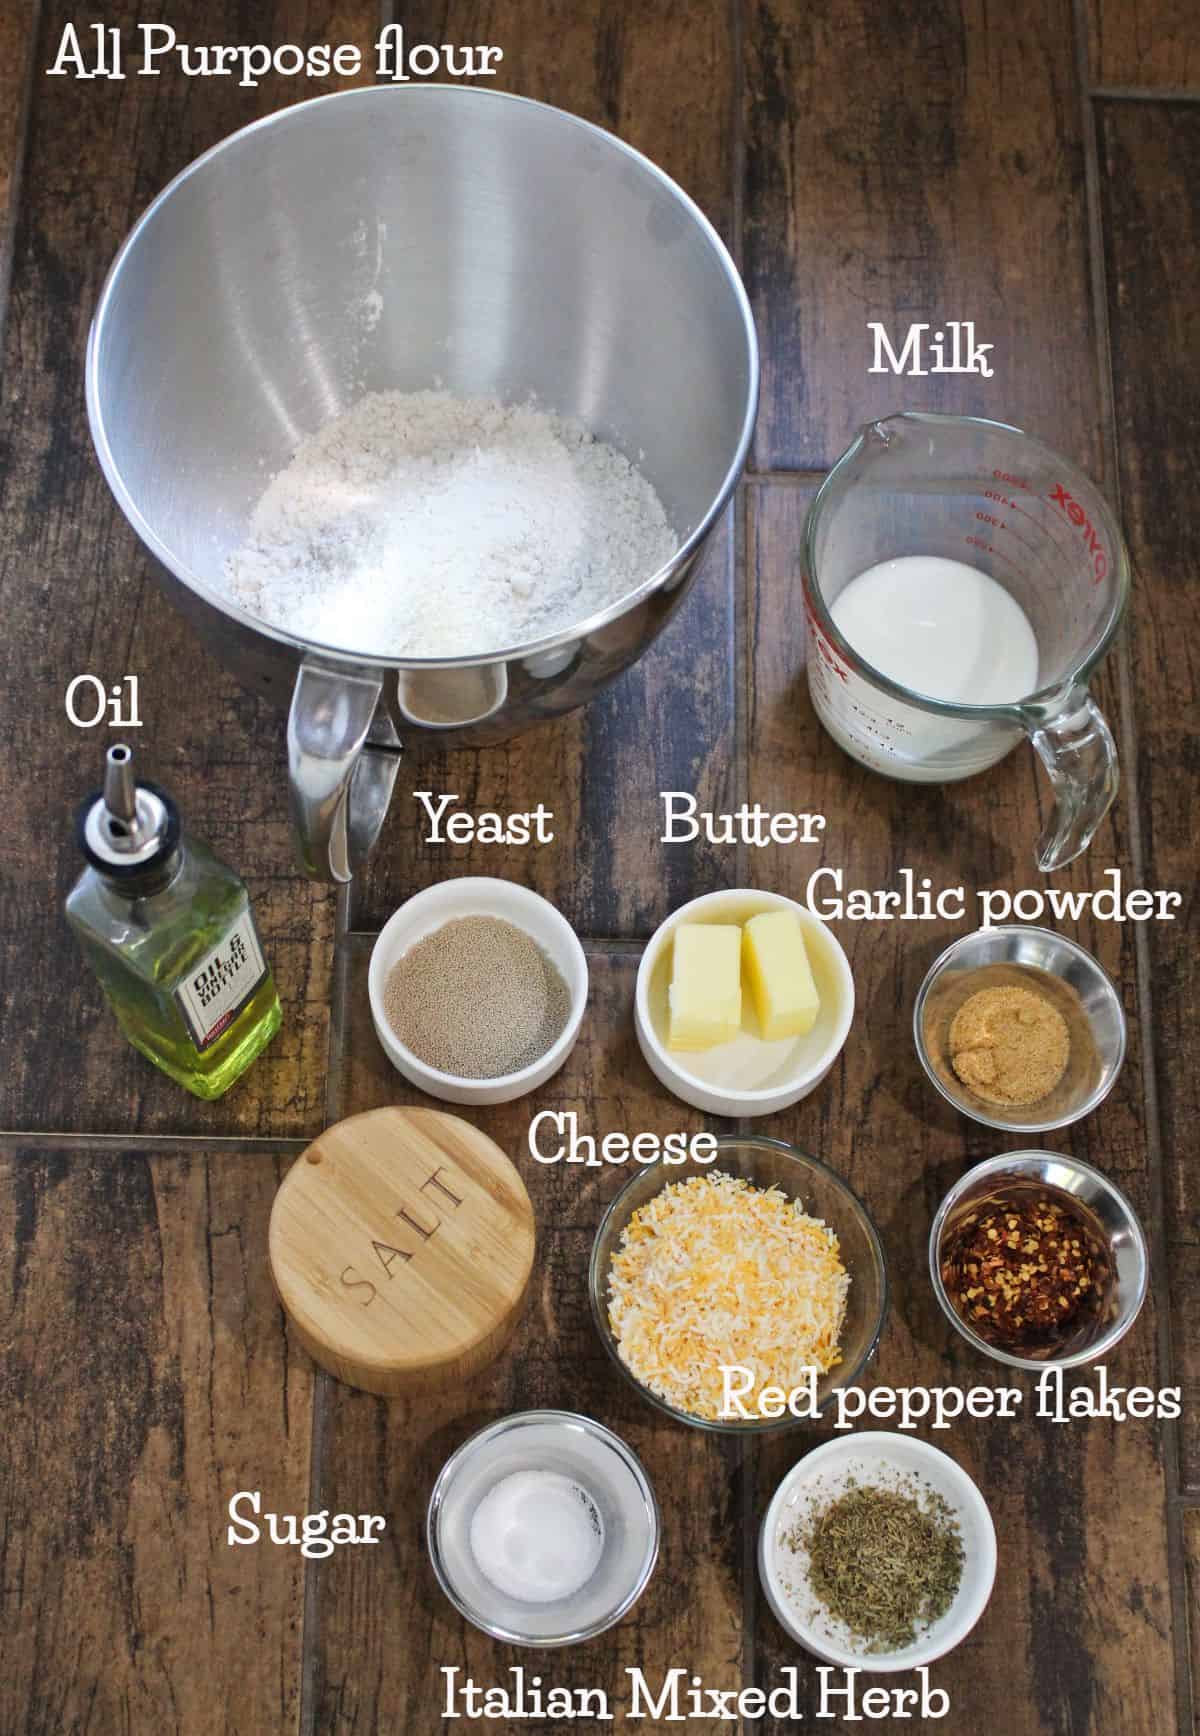
Ingredients Needed
Check the recipe card at the bottom of the page for exact measurements and printable detailed recipes.
Ingredients to make Herb And Cheese Pull Apart Bread - Makes one 9 X 4-inch loaf
For the dough
- All Purpose flour - I have not yet tried this with whole wheat flour but will be trying it soon with 50% APF and 50% whole wheat flour.
- Warm Milk - To proof the yeast and also to make the dough. We are using milk entirely to make the dough.
- Active dry yeast - This is what I used today but Instant yeast will work as well. If using instant yeast, there is no need to activate the yeast in warm milk before using. We can use it directly in the dry ingredients.
- Sugar - Just a little to activate the yeast.
- Butter - We need softened butter to add to the dough. We can use salted or unsalted, but I have used unsalted butter.
- Garlic powder - To flavor the dough.
- Salt
- Oil - to grease the bowl and the loaf pan.
For the filling
- Melted butter - to brush the dough before layering the herbs and the cheese.
- Provencal or mixed herbs - I used Italian Mixed herbs in the Pull apart bread recipe.
- Crushed red chili flakes - I love this to spice the bread a little.
- Grated cheese - I used a Mexican blend, but can use any cheese of your choice.
Step-by-step Process
Making the Dough
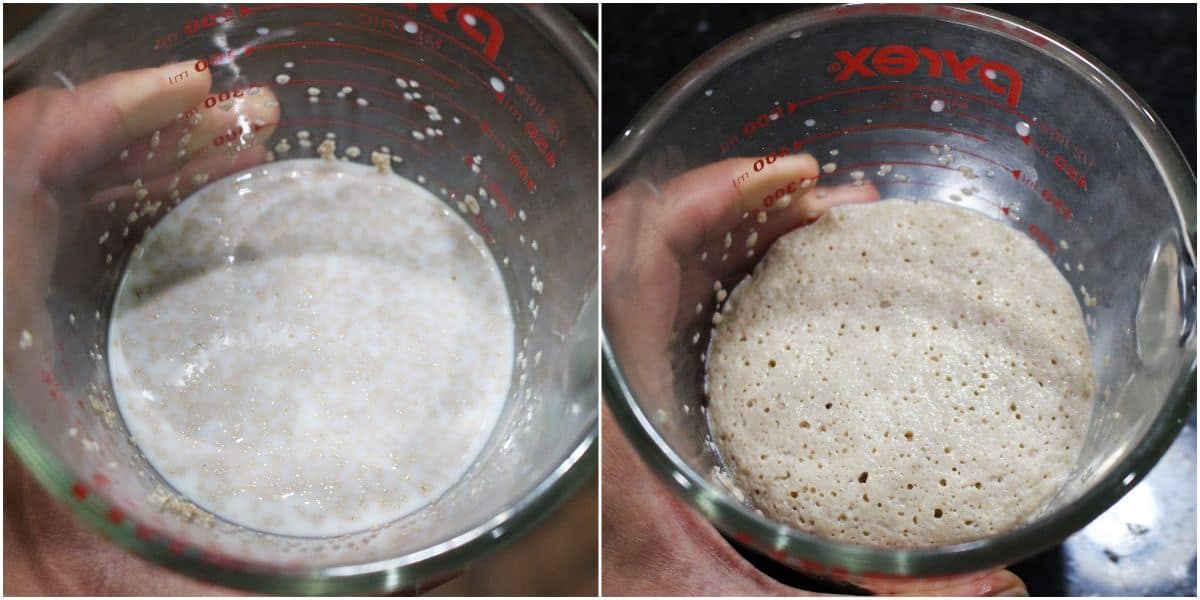
- In a small bowl, dissolve the yeast in ½ cup of warm milk and sugar. Leave aside for about 5 mins, until the yeast gets activated and froths up.
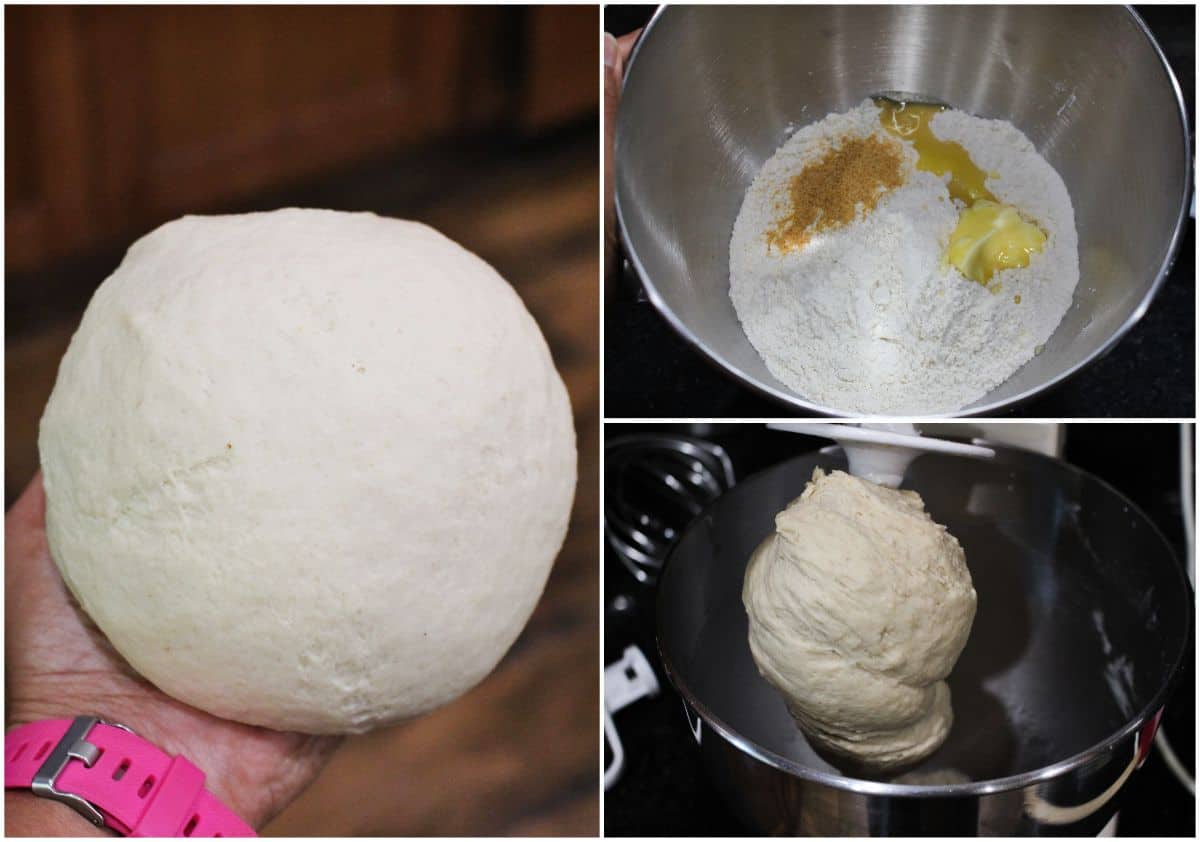
- In the bowl of a stand mixer, add 2 ¾ cups of flour, salt, garlic powder, and softened butter. With the dough hook on, mix it for a couple of minutes.
- Now add the frothed-up yeast mixture and the remaining ¾ cup of milk and knead it to form a smooth, soft, elastic dough. Make sure the dough is not sticky. If the dough appears sticky add the remaining ¼ cup of flour in batches until it forms an elastic dough. Do not dump all the remaining flour, just add enough until it forms a soft dough.
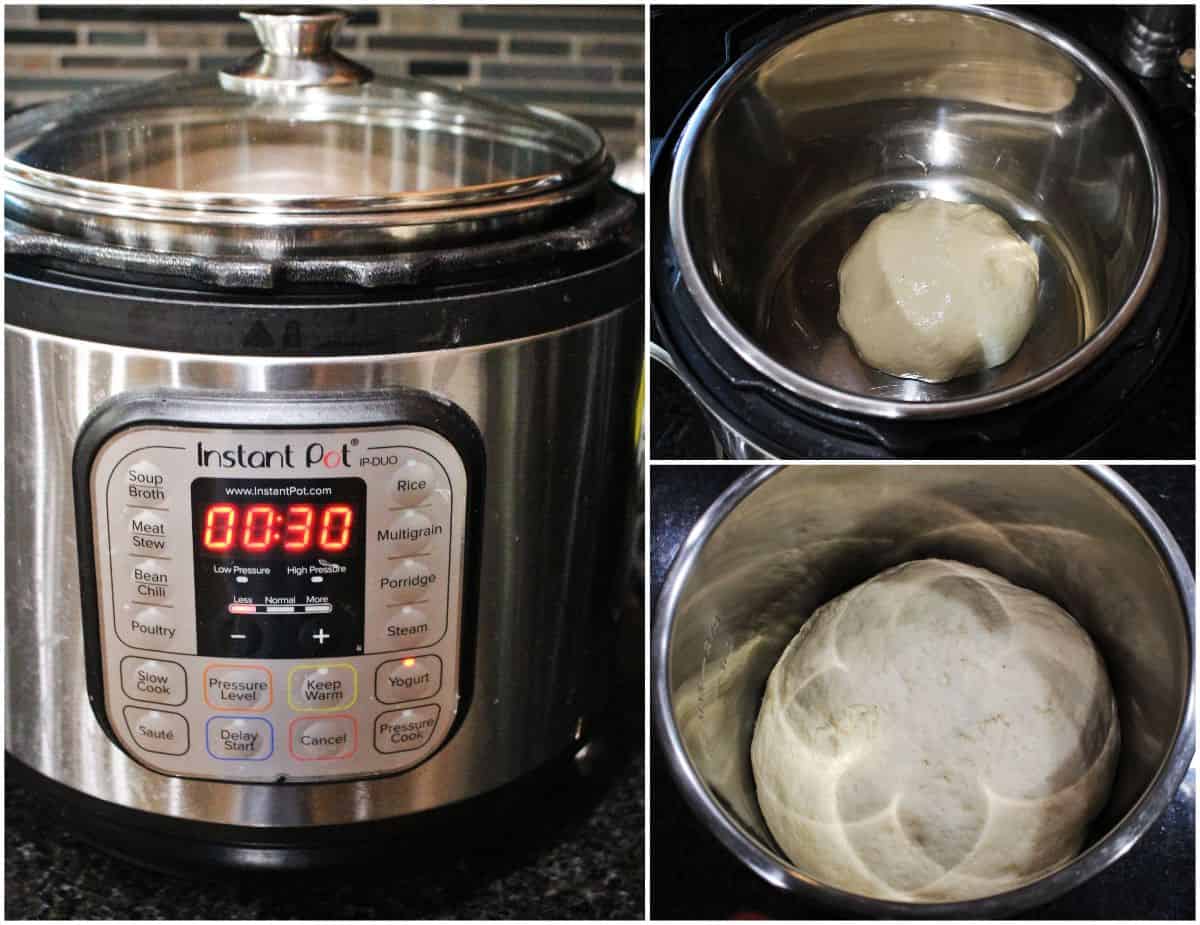
- Shape the dough into a ball and then place it in a well-oiled bowl. Turn the dough over in the bowl, so that it is evenly coated with oil. Cover the bowl with plastic wrap and let it rise for about an hour to 1 ½ until it is doubled in size.
- I used my Instant Pot to proof the dough and it took me just 30 minutes to do the first proofing. I set it on yogurt mode and set it to low heat and timed it for 30 minutes. Make sure you use a glass lid to cover the IP and not the actual lid as it could get stuck under pressure.
- If the dough appears not completely proofed, let it continue for 10 more minutes or until it is doubled.
Shaping the Bread
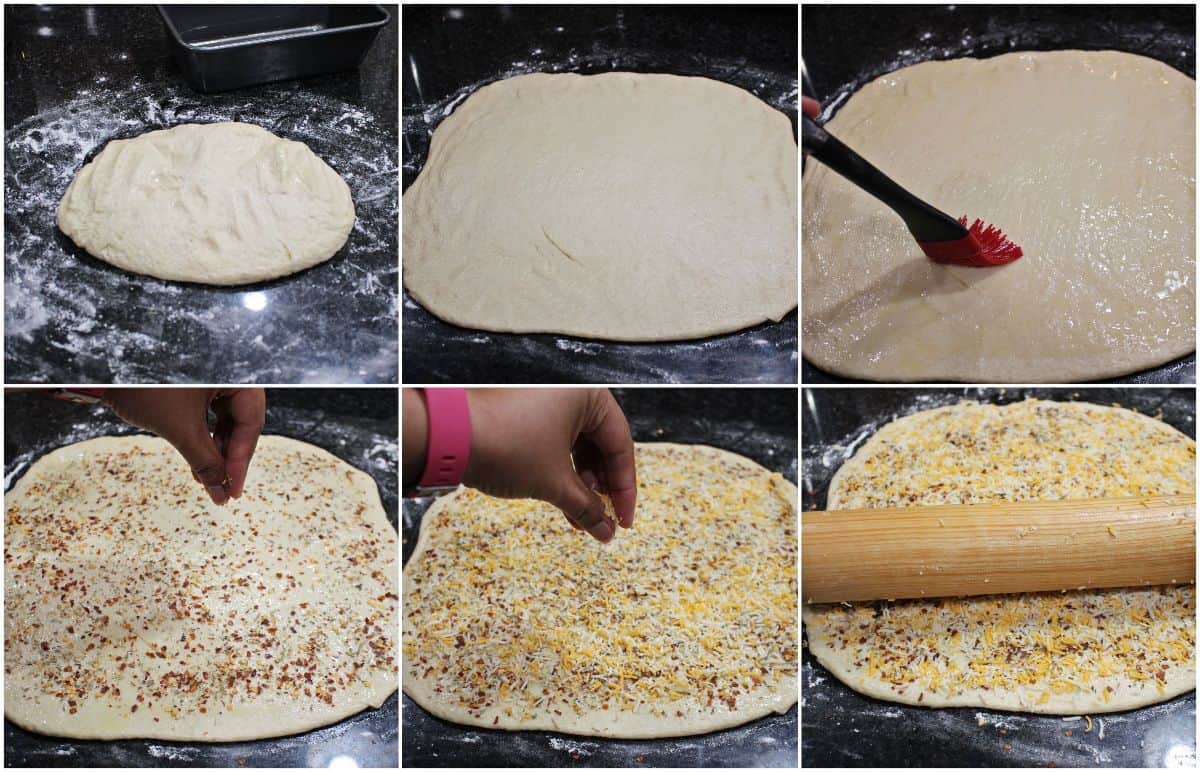
- Dust the work surface lightly with flour and dump the raised dough. Deflate the dough and form a square with it. Now roll it out to form a 12 x 12 square.
- Brush the surface with melted butter and evenly add the herb and crushed red pepper. Also, spread the cheese over the dough and using a rolling pin, slightly roll on top of the dough, so that the filling sticks better to the dough.
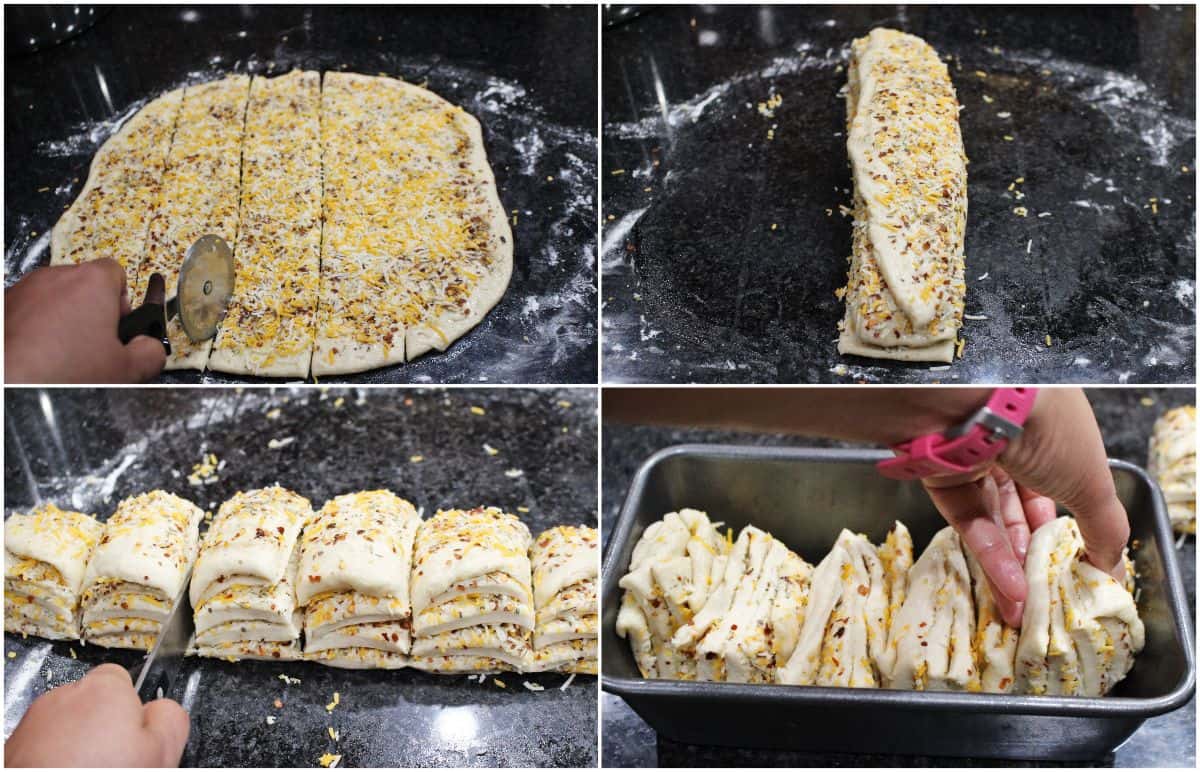
- Using a pizza cutter, slice the dough into 6 even strips.
- Lay each strip on top of another with the topping facing up. The strips need not be perfect, just make sure you evenly try to stack them.
- Now with a very sharp knife, cut straight down the stack dividing it into 6 equal squares.
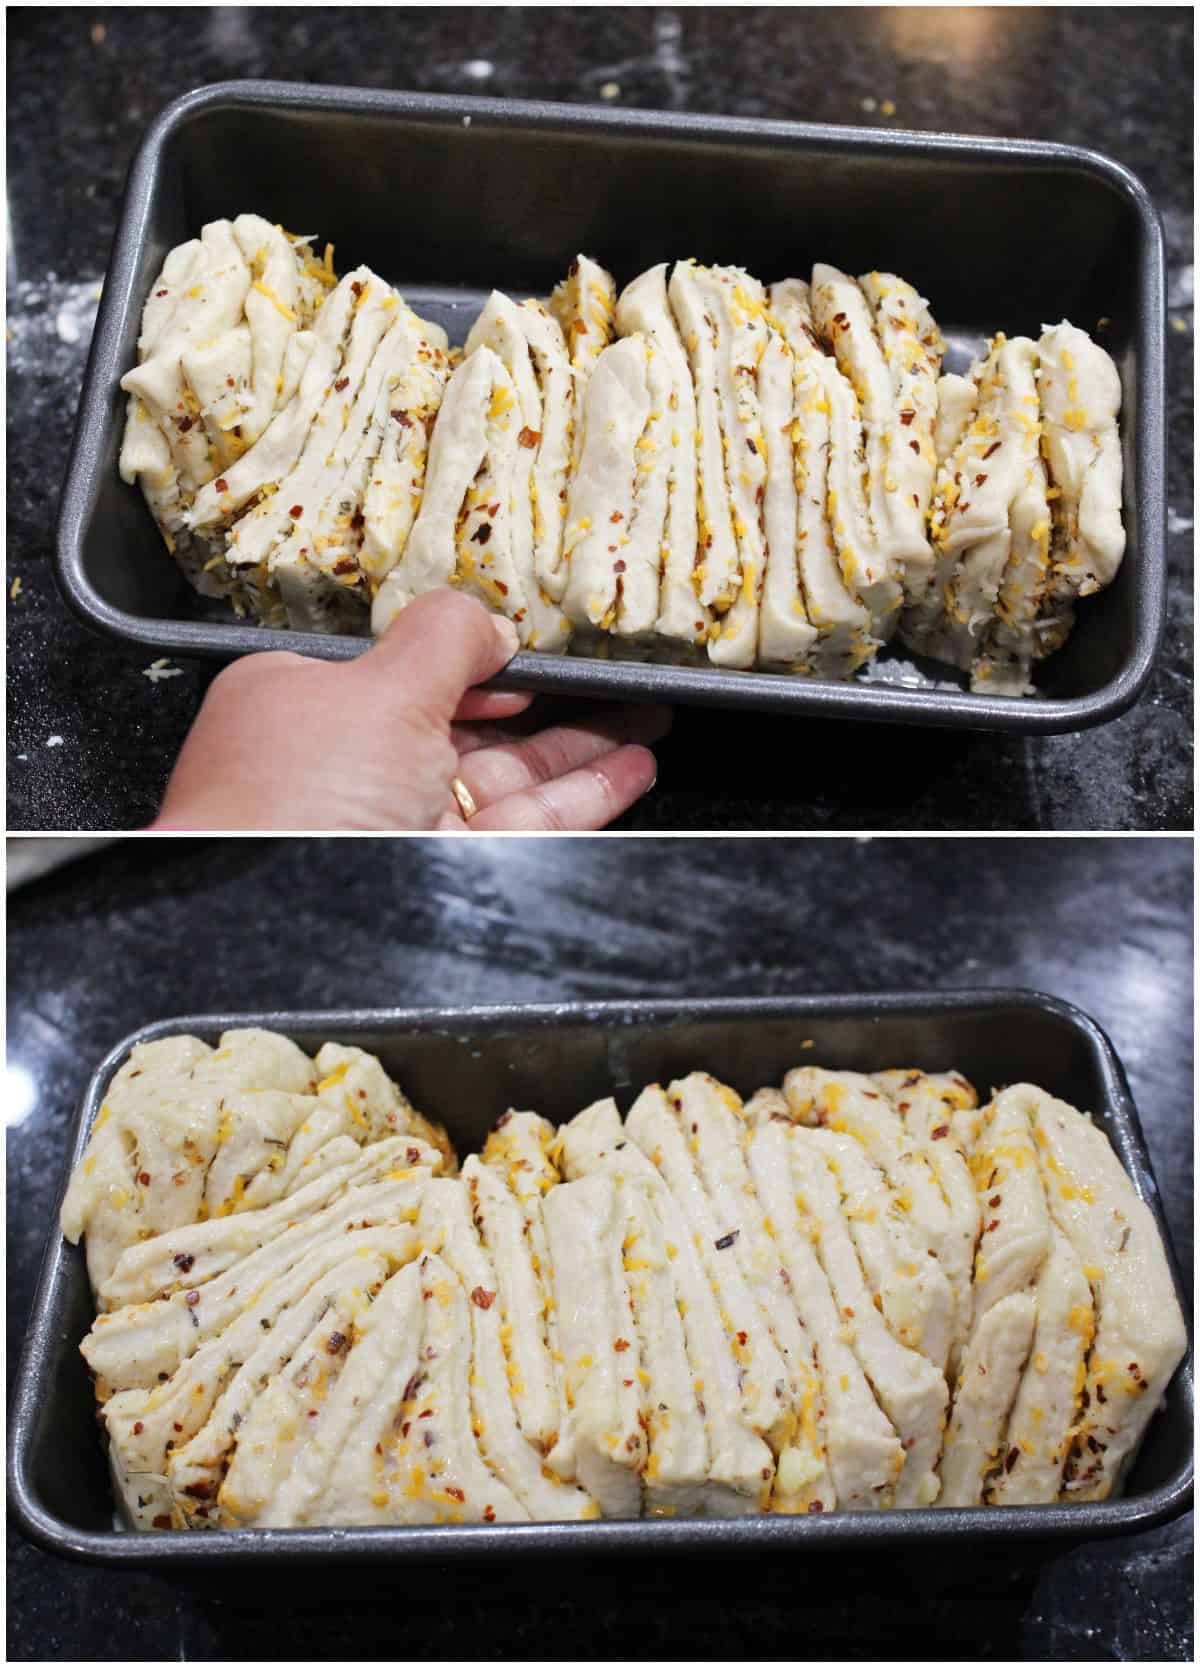
- Grease and lightly flour a 9 x 4 loaf pan. Layer the square slices, cut side down into the loaf pan.
- Wrap the loaf pan with a towel or plastic wrap and let it rise again for about an hour.
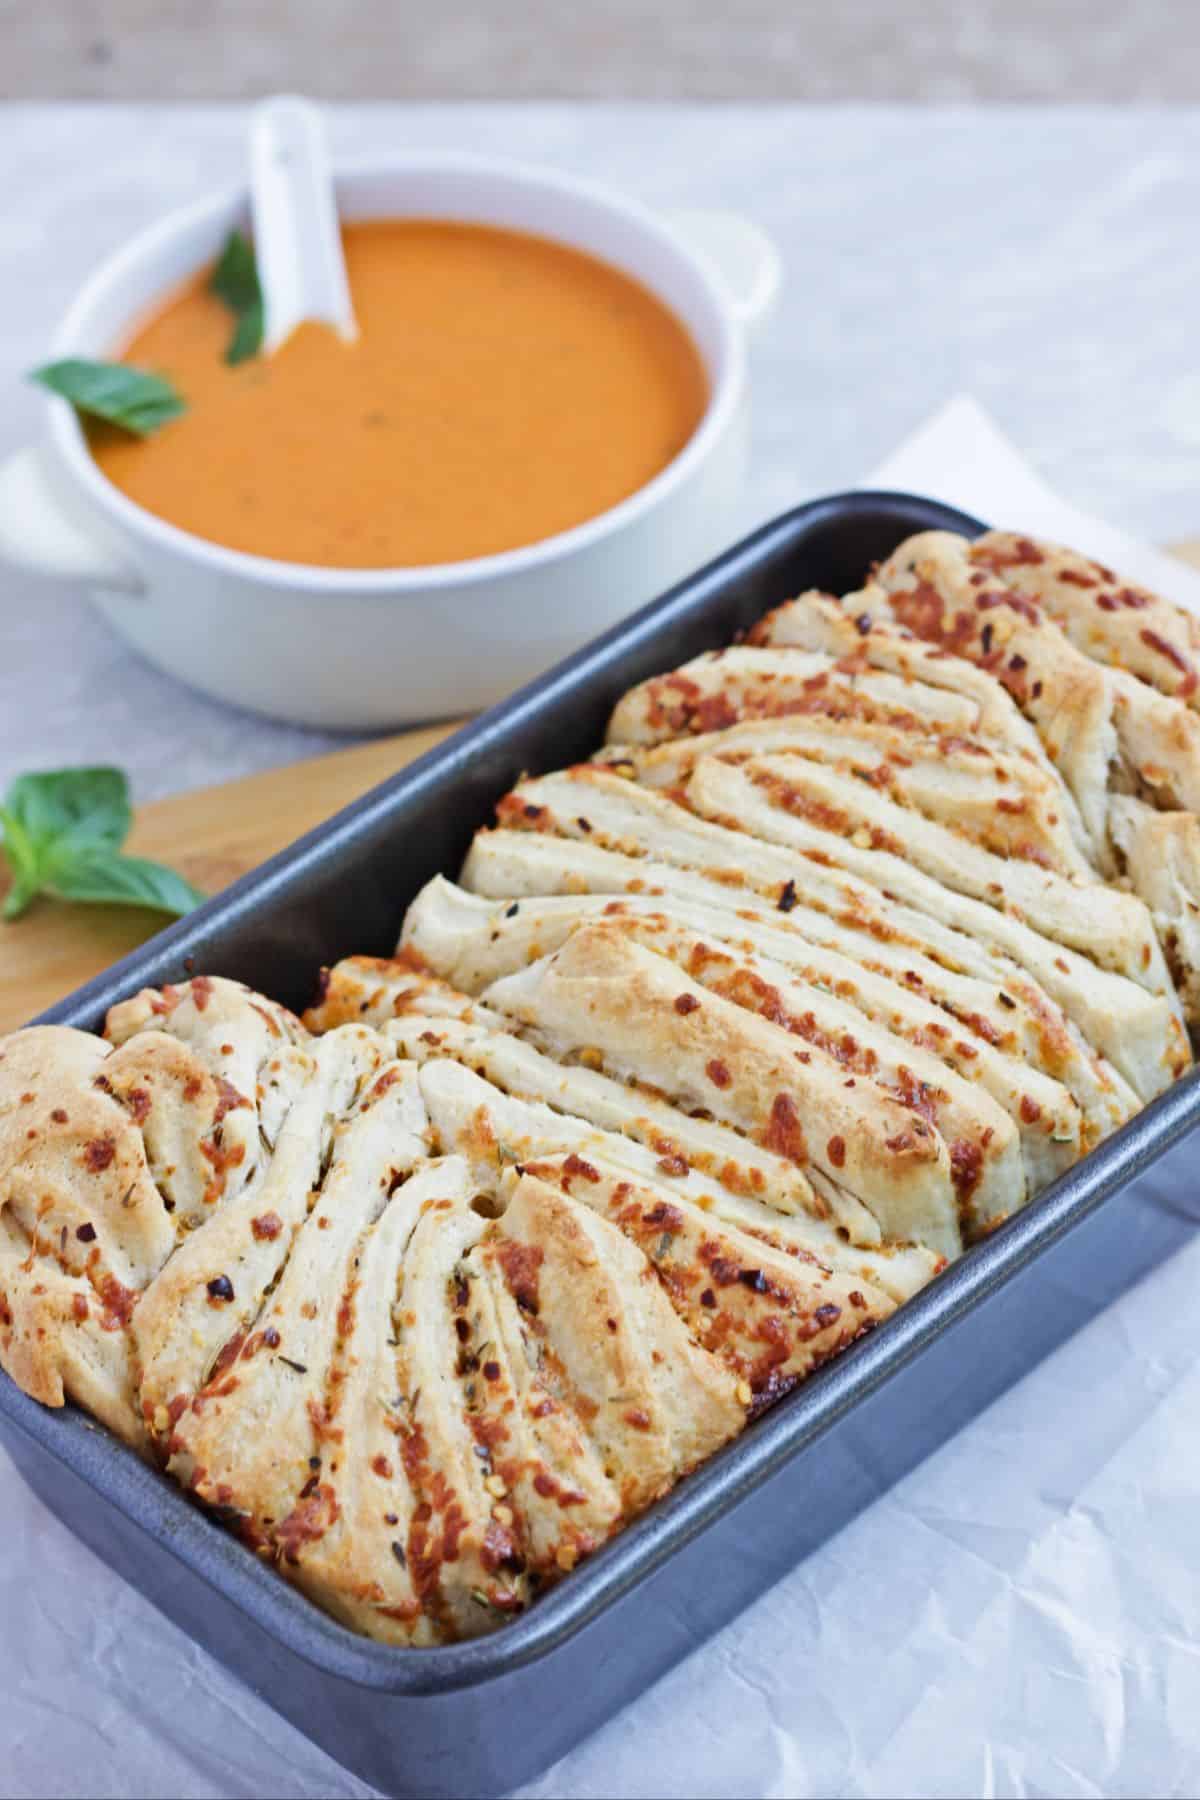
- Lightly brush the top with milk and bake it in a preheated 350 F oven for about 30 - 40 mins, until it is done and the top is golden brown.
- Let it cool on a wire rack and then start pulling it apart and eating!
Expert Tips and FAQ's
- Knead the dough well for the best-textured bread. You can knead it by hand as well but make sure you knead until it is soft and pliable.
- Proof the dough until doubled in size. IP cut down the first proofing time by half.
- Grease the inner pot of the IP well before placing the dough for proofing.
- Use adequate herbs and seasoning to flavor the bread well.
- Bake the bread in the middle rack for the best result.
- Slice the dough with a sharp knife to avoid squishing the dough too much.
More Pull-Apart Breads to enjoy
Pull Apart Garlic Bread - If there is one bread you need to try immediately, it has to be this garlic pull-apart bread. Bake it and see it disappear right in front of your eyes.
Monkey Bread - Pull-apart sweet bread is perfect for any occasion. Celebrations or holiday parties, this bread will be everyone's favorite.
Pull Apart Potato stuffed Pinwheel rolls - Be innovative and use the leftover soggy French fries to make the filling for this amazing pinwheel roll bread.
Honeycomb Buns - These stuffed and pull-apart buns are so delicious and the choices of filling is unlimited. Make it sweet or savory and they will be loved equally.
If you made this recipe and liked it, give a star rating on the recipe card or let me know in the comments below. You could also share it with me on Instagram using #MyCookingJourney and tagging me @sandhya.ramakrishnan. You could follow me and my recipes on Facebook |Instagram | Pinterest | twitter
Recipe
Herb and Cheese Pull Apart Bread
Equipment
- Oven
- Stand Mixer
- Instant Pot
Ingredients
For the dough
- 3 cups All Purpose flour
- 1 ¼ cup Milk warm
- 2 teaspoon Active dry yeast
- 1 teaspoon Sugar
- 2 tablespoon Butter softened
- 1 teaspoon Garlic powder
- 1 teaspoon Salt
For the filling
- 1 ½ tablespoon Melted butter
- 2 teaspoon Italian mixed herbs
- 1 teaspoon Crushed red chili flakes optional
- ½ cup Grated cheese
Instructions
Making the Dough
- In a small bowl, dissolve the yeast in ½ cup of warm milk and sugar. Leave aside for about 5 mins, until the yeast gets activated and froths up.
- In the bowl of a stand mixer, add 2 ¾ cup of flour, salt, garlic powder and softened butter. With the dough hook on, mix it for couple of minutes.
- Now add the frothed up yeast mixture and the remaining ¾ cup of milk and knead it to form a smooth, soft, elastic dough. Make sure the dough is not sticky. If the dough appears sticky add the remaining ¼ cup of flour in batches until it forms a elastic dough. Do not dump all the remaining flour, just add enough until it forms a soft dough.
- Shape the dough into a ball and then place it in a well oiled bowl. Turn the dough over in the bowl, so that it is evenly coated with oil. Cover the bowl with plastic wrap and let it rise for about a hour to 1 ½ until it is doubled in size.
- I used my Instant Pot to proof the dough and it took me just 30 minutes to do the first proofing. I set it on yogurt mode and set it to low heat and timed it for 30 minutes. Make sure you use a glass lid to cover the IP and not the actual lid as it could get stuck under pressure.
- If the dough appears not completely proofed, let it continue for 10 more minutes or until it is doubled.
Shaping the Bread
- Dust the work surface lightly with flour and dump the raised dough. Deflate the dough and form a square with it. Now roll it out to form a 12 x 12 square.
- Brush the surface with melted butter and evenly add the herb and crushed red pepper. Also spread the cheese over the dough and using a rolling pin, slightly roll on top of the dough, so that the filling sticks better to the dough.
- Using a pizza cutter, slice the dough into 6 even strips.
- Lay each strip on top of another with the topping facing up. The strips need not be perfect, just make sure you evenly try to stack them.
- Now with a very sharp knife, cut straight down the stack dividing it into 6 equal squares.
- Grease and lightly flour a 9 x 4 loaf pan. Layer the square slices, cut side down into the loaf pan.
- Wrap the loaf pan with a towel or plastic wrap and let it rise again for about an hour.
- Lightly brush the top with milk and bake it in a preheated 350 F oven for about 30 - 40 mins, until it is done and the top is golden brown.
- Let it cool on a wire rack and then start pulling it apart the and eating!
This was our Easter bread. It was fantastic, yes easy and yes delicious.
My IP doesn’t have a yogurt setting. Any advice in how to proof it without the IP?
You don't have to proof it in a IP. Just set the dough in a warm draft-free place. It should proof in about 1 1/2 hours, depending on how warm it is.
Amazing. Loved it.
Thank you Puja!
Made the bread for dinner alongside pumpkin soup... loved it!!
IP proofing worker out really well. As it is getting cold here in my neck of the wood, used IP to proof. The bread is very flavorful with all those herbs and cheese.
I rememer baking this bread in 2013, I think it was one of the baking group. One of my favourites with soup or as it is as this bread is packed with flavours.
You are absolutely. That is exactly when I baked it too for the first time. Love it and one of my favorite ever.
This is such a perfectly baked pull apart bread...I love like herb flavored bread, it's been a while I have baked this!! I am now tempted to bake this as soon as possible ...Looks so delicious!!
This is perfectly baked pull apart bread! we like herb flavored bread, i never tried pull apart bread, hopefully i will make soon for thanksgiving day!
Just love the whole pattern of the bread, looks amazing. I love making pull apart bread especially when I have some guests over, its like have a bit but not too much. Love how easily the layers pull off.
WOW - this bread is so good and I LOVE the filling. I cant wait until my Instant Pot comes (just ordered it). will definitely proof the dough that way next time.
Loved the idea of pull apart bread. Cheese filling and aromatic herbs are surely giving a lovely texture and flavoured bites.
Wow!!! These pull apart bread chunks looks amazing; cheesy, herby and loving the texture dear! Your step-wise pics sure makes it easy to make these even for a novice baker! I am gonna try the Instant Pot proofing next time; sure saves a lot of time!
Pull apart bread with garlic, cheese and Italian herbs sounds so flavorful ! A perfect pair with soup on a cold winter night . Would love trying it with whole wheat flour.
I haven't baked pull apart bread in a really long time and my girls love anything to do with cheese... I am so tempted to bake some as soon as possible after seeing your pictures and recipe, but somehow these days, my lazy bone has been up for too long than usual and I am trying to operate it... :/ Oh, I wish I could pull one slice apart now... Yum!
My family loves bread and cheese and your delicious looking, perfectly baked pull apart bread with herb and cheese would be a great addition to the list.
Thanks for sharing.
We love cheese and bread. Your pull apart bread with herb and cheese was the perfect recipe for my family. The step by step photos were very helpful. Thanks for sharing this.
For how long would you knead the dough in the stand mixer? Approximate time is good enough. Thanks
Sangeeths, about 5 to 6 minutes. You will notice that the dough becomes more pliable as it kneads.
lovely bread... came through google plus... happy to follow u... 🙂
YOur Pull-Apart has turned out perfect! 🙂
lovely loaf..perfectly made
Flavorful n Aromatic Bread!!!
Welcome to the bread baking group. Your pull a part looks good.
So soft n delicious looking bread, nice pictorial!!
Thanks Sangeetha!
Delicious bread, Sandhya, who can say no to homemade fresh bread.
Thanks Swathi! I absolutely agree. The pleasure and flavors are immense in a homemade bread.
So delicious ...so tempting...
Thanks Gayathri!
yum yum and very flavorful....looks delicious n tasty, loved it Sandhya....
Thanks guys!
wonderful step by step pictures dear, very well baked!!!
Thanks Sangeetha!
This bread looks soft and very pull-apart-like. Hope to be baking along with you in the coming months.
Thanks Lata! I am also very excited to be a part of this group and looking forward to the coming months 🙂
the breat loks great... and your step by step pics make it very easy to understand....
Thanks Deepika! Your pull apart looks wonderful as well!
Ah.. so here is the aromatic bread! Loved it Sandhya 🙂
Thanks Nandita! We truly enjoyed it too 🙂
this looks yummy sandy except that yeast is giving me prb
Thanks Meena aunty. If the yeast is fresh, it should not give you too much trouble. Check for the expiry on the yeast.